


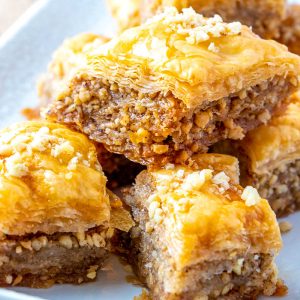
This best Baklava recipe takes time, but it is SO worth it! It is perfect for family functions, parties, holidays, or gifting!
For only $0.50 per slice, you can make this dessert at home for a way more affordable price than buying it at the bakery. It makes 32 servings and costs a total of $16.04.
For more decadent desserts, I recommend these Pink Macarons, Spiced Creme Brulee, and Homemade Cannoli.
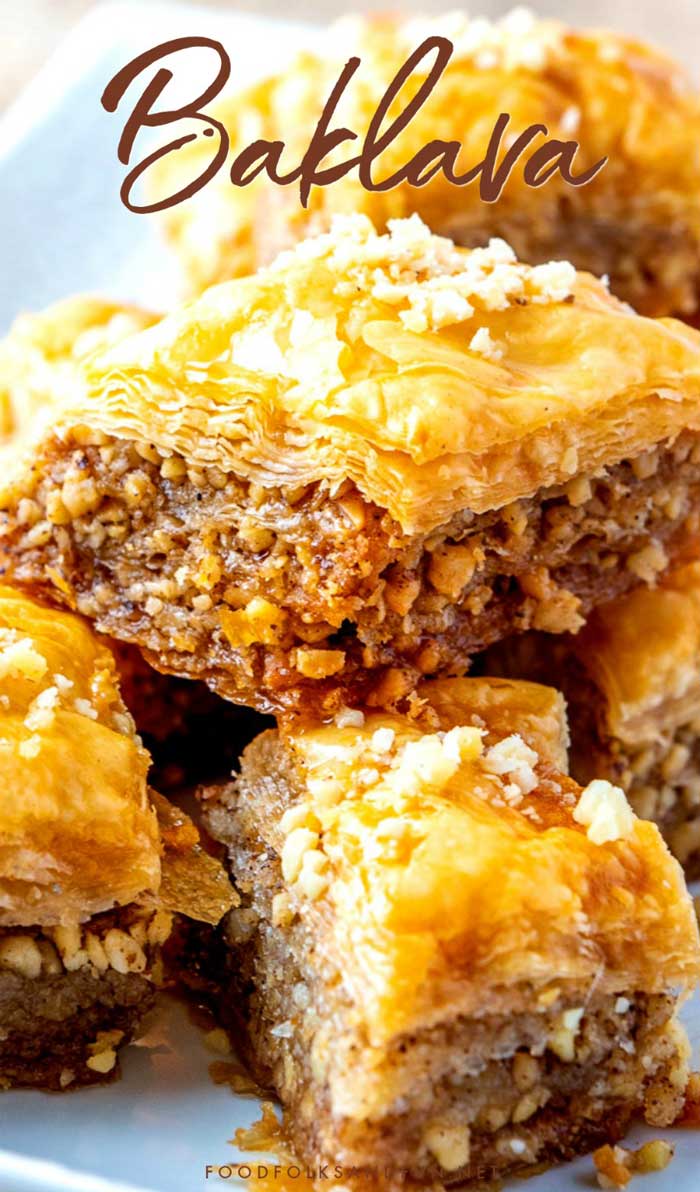
Table of Contents
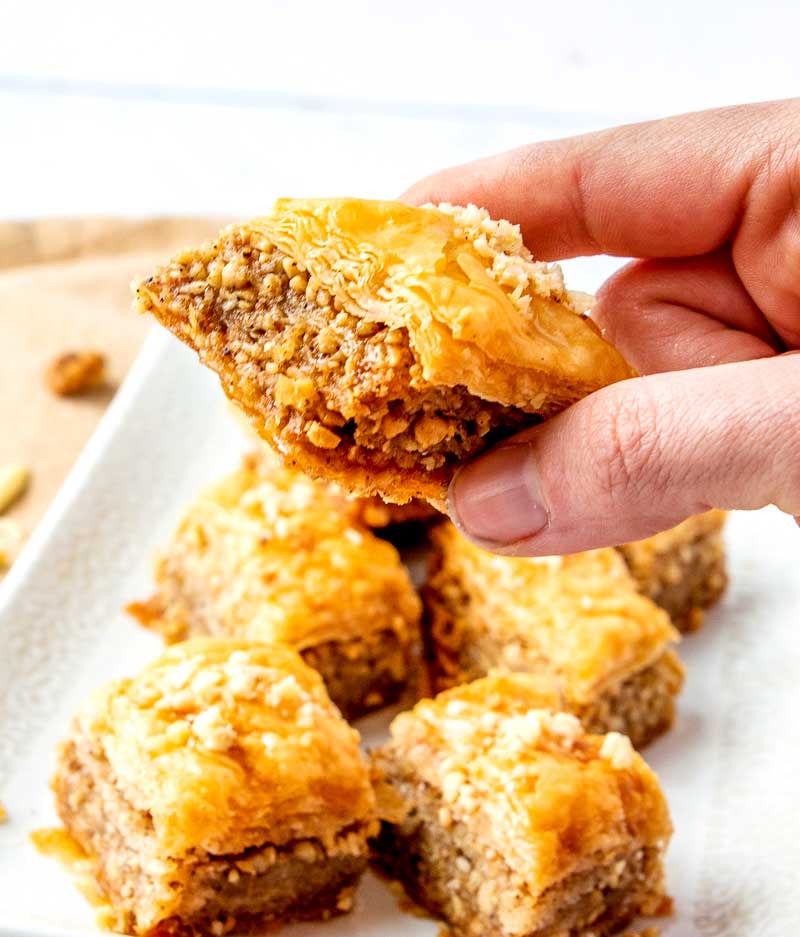
Baklava is a dessert that has a crunchy filling between layers of buttery phyllo sheets. It is flaky, tender, and crisp, with a warm honey syrup drizzled over the top.
I LOVE baklava and have always wanted to make it myself. I finally got up the courage to make it a few days ago with America’s Test Kitchen’s recipe, and I am SO glad that I did.
Yes, this homemade pastry is super time-intensive, but I would argue that it is well worth the time. It’s such a delicious and impressive dessert. It’s perfect anytime of the year and even for holidays like Easter and Christmas!
I love it when recipes have a story or some history behind them. When I read and research a recipe’s history or even hear family stories connected to different recipes, I get excited.
Maybe it’s the former history teacher in me, but the entire process is enjoyable either way. It makes me feel more connected to what I am creating in my kitchen.
Recipe History:
After making Baklava for the first time, I became very interested in the recipe and baklava origin. I found out a couple of things about Baklava that made me love it even more.
Did you know that it was once believed to be a rich person’s dessert? In fact, according to The Kitchen Project, there is still a saying in Turkey today that is commonly used by people who say, “I am not rich enough to eat baklava every day.”
The other fun thing that I learned is that Baklava is believed to aid in the romance department. The spices are considered to be an aphrodisiac.
Knowing the history of this delicious pastry, I feel kind of fancy when I make it, and I think it can turn any occasion into a special occasion!
How to Make Baklava?
- For the syrup, mix the ingredients in a small saucepan and bring it to a boil. Stir it until the sugar dissolves. Next, you will transfer it to a separate bowl and let it cool.
- For the nut filling, you will first finely crush the almonds and the walnuts and combine them. Save one tablespoon for the garnish. Add the spices to the nuts.
- To put the Baklava together, get ready to repeat and repeat. Be sure to brush your baking dish with melted butter first. Then, unwrap and unfold phyllo on a large cutting board. Carefully smooth with your hands to flatten. Using your pan as a guide, cut sheets crosswise, leaving you with two evenly sized stacks of phyllo. Cover them with plastic wrap and then a damp kitchen towel to keep them from drying out. Place one phyllo sheet on the bottom of the pan and brush it with butter. Repeat this with seven more phyllo sheets.
- Next, spread a portion of the nut mixture over the phyllo and dab with butter. Repeat with five more phyllo sheets—layer with another cup of nuts, six phyllo sheets, and remaining nuts. You will finish with 8-10 sheets. Brush each layer with melted butter except for the last layer. Using your hands, compress the layers to push out air pockets.
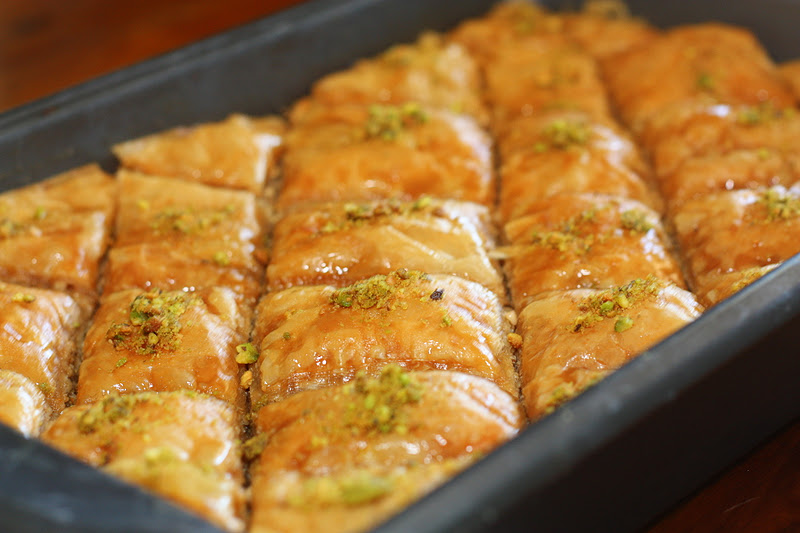
- Right before baking, top with melted butter and cut diamond-shaped cuts into the Baklava with a sharp knife. Bake for about 1.5 hours or until the top is golden brown. Then, pour the syrup over the baklava as soon as it comes from the oven. Let it cool to room temperature, and then enjoy this decadent dessert!
For more details, check out the VIDEO RECIPE in the recipe card below.
Cook’s Tools:
- Metal baking pan
- Small saucepan
- Liquid measuring cup
- Zester
- Food processor
- Measuring spoons and cups
- Mixing bowls
- Pastry brush
- Cutting board
- Chef’s knife
Ingredients and Cost:
RECIPE COST: $16.04
PER SERVING COST: $0.50
NOTE: The recipe prices are calculated by using grocery store websites. The actual cost of the recipe will vary depending on what ingredients you already have.
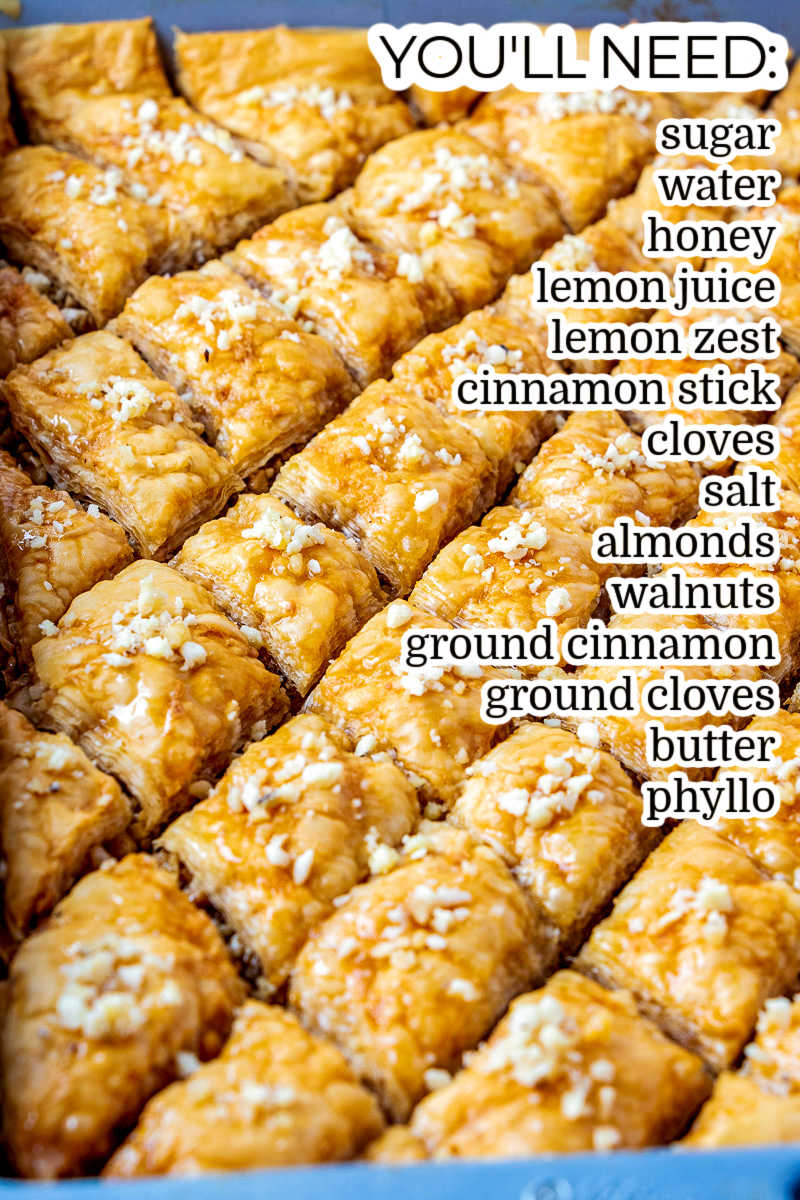
- 1 ¼ cups granulated sugar – $0.29
- ¾ cup water – $0.00
- ⅓ cup honey – $0.91
- 1 Tablespoons lemon juice – $0.07
- 3 large strips lemon zest – $0.16
- 1 medium cinnamon stick – $0.34
- 5 whole cloves – $0.90
- ⅛ teaspoon table salt – $0.01
- 8 ounces slivered almonds – $4.98
- 4 ounces walnuts – $1.56
- 1 ¼ teaspoons ground cinnamon – $0.05
- ¼ teaspoon ground cloves – $0.43
- 2 Tablespoons granulated sugar – $0.04
- 1 pound frozen phyllo – $4.69
- ⅛ teaspoon table salt – $0.01
- 1 cup unsalted butter – $1.60
What is baklava?
Baklava is a sweet pastry made of layers of filo or phyllo. Are you now wondering what phyllo is now? It is thin layers of dough. This rich dessert is filled with nuts and dripping with either honey or syrup or both!
Which country is baklava from?
Like many ancient recipes, it is hard to pinpoint this recipe’s exact origin because many nations have a claim to their version of baklava. Many agree that baklava originates from ancient Greece.
How do you keep baklava crispy?
Three things will prevent the Baklava from getting soggy.
- Make sure that the syrup is cooled before pouring it over the hot baklava.
- Keep the baklava at room temperature after covering it with a tea towel or piece of cheesecloth.
- Cover it after it has cooled completely.
Should I cover baklava?
Yes, you should cover the baklava after it has cooled completely. Use a tea towel or a piece of cheesecloth to cover it.
How Long Is It Good For:
SERVE & STORE: Keep leftovers loosely covered at room temperature for up to 5 days.
FREEZE: Unfortunately, when you freeze the baked baklava, the phyllo especially loses texture. Therefore, I do not recommend freezing baklava.
More Dessert recipes:
- Chocolate Whoopie Pies
- Copycat Carrot Cake Cheesecake Cake
- Strawberry Lasagna
- Lemon Cream Pie Cheesecake Dip
- Cinnamon Crumb Cake
- Lemon Lush
- Strawberry Shortcake Roll-up Cake
- Carrot Cake Whoopie Pies
- Holy Cannoli Ice Cream
- Homemade Cannoli Shells
- Strawberry Shortcake
- Cannoli Cupcakes
Save The Recipe
Enter your email below & we’ll send a link to this recipe to your inbox & you’ll subscribe for new recipes
Baklava
Video
Equipment
- small saucepan
- liquid measuring cup
- food processor
- 9×13 metal pan
- pastry brush
- serrated knife
Ingredients
FOR THE SUGAR SYRUP:
- 1 ¼ cup granulated sugar
- ¾ cup water
- ⅓ cup honey
- 1 Tablespoon lemon juice
- 3 large strips lemon zest removed in large strips with vegetable peeler
- 1 medium cinnamon stick
- 5 whole cloves
- ⅛ teaspoon table salt
FOR THE NUT FILLING:
- 8 ounces blanched slivered almonds
- 4 ounces walnuts
- 1 ¼ teaspoon ground cinnamon
- ¼ teaspoon ground cloves
- 2 Tablespoons granulated sugar
- ⅛ teaspoon salt
EVERYTHING ELSE:
- 1 cup unsalted butter melted
- 1 pound frozen phyllo thawed
Instructions
MAKE THE SUGAR SYRUP:
- Combine syrup ingredients in a small saucepan and bring to a full boil over medium-high heat, occasionally stirring to ensure that sugar dissolves. Transfer to 2-cup measuring cup and set aside to cool while making and baking baklava; when syrup is cool, discard spices and lemon zest. (Cooled syrup can be refrigerated in an airtight container for up to 4 days.)
MAKE THE NUT FILLING:
- Pulse almonds in a food processor until very finely chopped, about twenty 1-second pulses; transfer to a medium bowl. Pulse walnuts in a food processor until very finely chopped, about fifteen 1-second pulses; transfer to bowl with almonds and toss to combine. Measure out 1 tablespoon nuts and set aside for garnish. Add cinnamon, cloves, sugar, and salt; toss well to combine.
ASSEMBLE:
- Brush 13 x 9-inch traditional (not nonstick) baking pan with butter. Adjust oven rack to lower-middle position and heat oven to 300 degrees. Unwrap and unfold phyllo on a large cutting board; carefully smooth with hands to flatten. Using the baking pan as a guide, cut sheets crosswise with a chef’s knife, yielding two roughly evenly sized stacks of phyllo (one may be narrower than the other). Cover with plastic wrap, then damp kitchen towel to prevent drying.
- Place one phyllo sheet (from the wider stack) at the bottom of baking pan and brush until completely coated with butter. Repeat with 7 more phyllo sheets (from the wider stack), brushing each with butter.
- Evenly distribute about 1 cup of nuts over phyllo. Cover nuts with a phyllo sheet (from the narrower stack) and dab with melted butter (phyllo will slip if butter is brushed on). Repeat with 5 more phyllo sheets (from the narrower stack), staggering sheets slightly if necessary to cover nuts, and brushing each with butter. Repeat layering with additional 1 cup nuts, 6 sheets phyllo, and the remaining 1 cup nuts. Finish with 8 to 10 sheets phyllo (from the wider stack), using nicest and most intact sheets for uppermost layers and brushing each except final sheet with butter.
- Use palms of hands to compress layers, working from the center outward to press out any air pockets. Spoon 4 tablespoons of melted butter on the top layer and brush to cover all surfaces. Use a bread knife or any other serrated knife with a pointed tip in a gentle sawing motion to cut the baklava into diamonds, rotating the pan as necessary to complete the cuts. (Cut on the bias into eighths on both diagonals.)
BAKE AND FINISH:
- Bake until golden and crisp, about 1.5 hours, rotating the baking pan halfway through baking. The top should be golden brown. Immediately after removing the baklava from the oven, pour cooled syrup over cut lines until about 2 tablespoons remain (syrup will sizzle when it hits the hot pan); drizzle remaining syrup over the surface. Garnish the center of each piece with a pinch of reserved ground nuts. Cool to room temperature on a wire rack, about 3 hours, then cover with foil and let stand at least 8 hours before serving. (Once cooled, baklava can be served, but flavor and texture improve if left to stand at least 8 hours. Baklava can be wrapped tightly in foil and kept at room temperature for up to 10 days.)
Notes
- Depending on your cuts, this recipe will make about 32-40 diamond-shaped pieces.
- A straight-sided traditional metal baking pan works best for making baklava; the straight sides give the Baklava nicely shaped edges.
- Make sure that the phyllo is fully thawed before use; leave it in the refrigerator overnight or on the countertop for four to five hours. When assembling, use the nicest, most intact phyllo sheets for the bottom and top layers; use sheets with tears or ones that are smaller than the size of the pan in the middle layers, where their imperfections will go unnoticed.
Nutrition
did you love this recipe?
Share it with me on Facebook and find more recipes on foodfolksandfun for more!
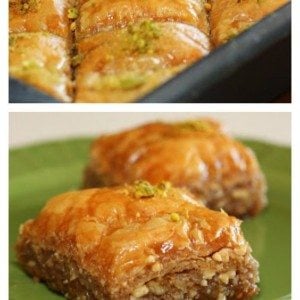
This post first appeared on Food Folks and Fun on October 4, 2011. I have since updated the pictures. Some of the originals are below.
subscribe for new recipes
Get all the latest recipes in your inbox!
connect with us
Make sure to tag #foodfolksandfun on instagram!


What a great job making that baklava. My mother in law was Middle Eastern and baklava was one of her specialities. Visiting from Gluten-Free A-Z Blog.
very nice and tastefull…try next time to replace almonds and wallnuts with pistachio!
This looks absolutely fantastic! Funny that it used to be considered a food for the rich considering how relatively inexpensive it is. Can’t wait to give it a try!
This is brilliant! I can’t wait to try it. I’ve just discovered that my local grocery store doesn’t have the frozen phyllo so I’ve just placed an order for it. Yay! I can’t wait. My mouth is watering already.
I havent had this is over 30 years and never knew how to make it what a great find this is thanks I will surely try it out
Ahhhh Baklava! Makes me think of my grandmother. This recipe is a little different than hers. Can’t wait to try it!